
Hi Java enthusiasts! I will show you how to quickly create Spring Boot app which supports basic authentication and communicates via rest. Enjoy your reading!
What do we need here? I will be using Intelij Idea (you can use Eclipse if you wish) along with jdk 11 and Gradle as a project building tool (again, you can use eg. Maven if that’s your favorite one).
Run InteliJ and create new Gradle project. Add the following dependencies to build.gradle file.
compile group: 'org.springframework.boot', name: 'spring-boot-starter-security', version: '2.1.5.RELEASE'
compile group: 'org.springframework.boot', name: 'spring-boot-starter-web', version: '2.1.5.RELEASE'
Refresh gradle project.
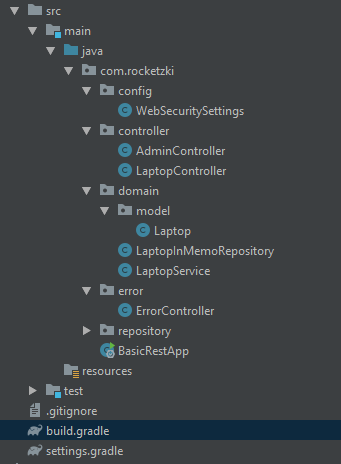
Now let’s prepare the project tree, I’ve done it like this:
Firstly we need to create main class which will start up the Spring Boot application.
BasicRestApp.java
package com.rocketzki;

import org.springframework.boot.SpringApplication;
import org.springframework.boot.autoconfigure.SpringBootApplication;

@SpringBootApplication
public class BasicRestApp {
    public static void main(String[] args) {
        SpringApplication.run(BasicRestApp.class, args);
    }


}
The @SpringBootAnnotation is an alias for @Configuration @EnableAutoConfiguration @ComponentScan annotations with their default attributes. It enables auto-configuration mechanisms, component scan and allows to add extra beans to the app context. So the application scans the main package, which in this case is com.rocketzki searching for components (like beans, components, services, repositories etc.).
Next thing we need to do is the configuration. I have coded something like this:
package com.rocketzki.config;

// imports ...

@EnableGlobalMethodSecurity(prePostEnabled = true)
@Configuration
@EnableWebSecurity
public class WebSecuritySettings extends WebSecurityConfigurerAdapter {


    @Override
    protected void configure(AuthenticationManagerBuilder authentication) throws Exception {
        authentication
                .inMemoryAuthentication()
                .withUser("johny")
                .password(passEncrypt().encode("ThePass12")).roles("USER")
                .and()
                .withUser("mary")
                .password(passEncrypt().encode("ThePass12")).roles("ADMIN");
    }


    @Override
    protected void configure(HttpSecurity http) throws Exception {
        http
                .httpBasic().and().authorizeRequests()
                .antMatchers("/rest/laptop/**", "/rest/laptops").permitAll()
                .antMatchers("/rest/admin/**", "/rest/laptop/add").hasRole("ADMIN")
                .and().csrf().disable().headers().frameOptions().disable().and()
                .sessionManagement().sessionCreationPolicy(SessionCreationPolicy.STATELESS)
                .and().logout();
    }

    @Bean
    public PasswordEncoder passEncrypt() {
        return new BCryptPasswordEncoder();
    }


}
The class is annotated with following annotations:
@Configuration
@EnableWebSecurity
@EnableGlobalMethodSecurity(prePostEnabled = true)
First one indicated that the following class is a configuration component and will be treated as such by the component scanner. The second one enables Spring Security features. Last but not at least – the WebSecuritySettings class extends WebSecurityConfigurerAdapter which provides base for Spring Security configuration object instantiation. @EnableGlobalMethodSecurity(prePostEnabled = true) – this annotation enforces authorization before method – each method invocation has to be authorized first.
The core and most interesting stuff lays within the methods. Let’s discuss them. The first overriden method sets up the AuthenticationBuilderManager – it will store our users. This is quite straightforward. The builder method built-in the class allows us to add users, their passwords and roles. I have also used BCryptPasswordEncoder by creating simple bean method within the configuration class – it will encode our password within the memory. User credentials aren’t usually hardcoded this way (they shouldn’t be at least) but this solution is just enough for sake of the demo.
The other method builds HttpSecurity object – it orchestrates our security details. I have set it like this:
httpBasic() – sets up the HTTP Basic authentication, authorizeRequests() and antMatchers(…) – we can specify custom permissions to URLs for our users based on their roles, .csrf().disable() – prevents from CSRF attacks, .sessionManagement().sessionCreationPolicy(SessionCreationPolicy.STATELESS) – session configuration – here we are enforcing session creation, .logout() – configures logout feature – user need to access /logout to logout the current session.
Controllers – our application needs a boundary through which it can communicate with the outer world. In this case I have created two controllers. First one just returns simple string for our admin user:
package com.rocketzki.controller;

import org.springframework.web.bind.annotation.GetMapping;
import org.springframework.web.bind.annotation.ResponseBody;
import org.springframework.web.bind.annotation.RestController;

@RestController
public class AdminController {

    @GetMapping("/rest/admin/me")
    @ResponseBody
    public String getAdminResponse() {
        return "Howdy you Admin Person.";
    }


}
Second one is more complex:
package com.rocketzki.controller;

// imports ...

import java.util.List;
import java.util.Map;

@RestController
@RequestMapping("/rest")
public class LaptopController {

    private LaptopService laptopService;

    @Autowired
    private void setLaptopService(LaptopService laptopService) {
        this.laptopService = laptopService;
    }

    @GetMapping("/laptops")
    @ResponseBody
    public List<Laptop> getAllLaptops() {
        return laptopService.getLaptops();
    }

    @GetMapping("/laptop/{id}")
    @ResponseBody
    public Laptop getById(@PathVariable("id") Integer id) {
        return laptopService.getById(id);
    }

    @PostMapping("/laptop/add")
    @ResponseStatus(HttpStatus.CREATED)
    @ResponseBody
    public Map addOne(@RequestBody Laptop laptop) {
        laptopService.addLaptop(laptop);
        return Map.of("massage", "Laptop: " + laptop.toString() + " has been added.");
    }


}
What do we have here? The class is annotated as a rest controller and the mapping is set to /rest so that server knows that each method within the controller can be accesses with /rest/ prefix – eg. localhost:8080/rest/laptops
I have added the LaptopService dependency and by using method dependency injection wiring the service to the controller. The next three methods are responsible for: getting list of all the laptops, getting a specific laptop, adding laptop sent by REST. Important thigs here are the annotations – @PostMapping indicates that the method is responsible for POST Http method, @GetMapping – for GET method. You may also encounter @RequestMapping(value =”PATH”, RequestMethod.GET) means actually the same, it’s the older convention but still correct and in use.
@ResponseStatus(HttpStatus.CREATED) – after successful laptop creation the application will respond with Http CREATED status – 201.
@PathVariable(“id”) – which is the method parameter annotation – binds the annotated variable to the one specified in the route – @GetMapping(“/laptop/{id}“) – “id” in this case.
Domain – the classes that describes laptop – this package contains classes responsible for storing laptop information, service and domain model.
package com.rocketzki.domain;


// import ...

import java.util.List;
import java.util.NoSuchElementException;

@Service
public class LaptopService {

    private InMemoRepository<Laptop> repo;

    @Autowired
    private void setRepo(InMemoRepository<Laptop> repo) {
        this.repo = repo;
    }


    public List<Laptop> getLaptops() {
        return repo.getItems();
    }

    public void addLaptop(Laptop laptop) {
        repo.addItem(laptop);
    }

    public Laptop getById(Integer id) {
        List<Laptop> theList = repo.getItems();
        if (!theList.isEmpty() && theList.size() > id) {
            return theList.get(id);
        } else {
            throw new NoSuchElementException("There's no such element in the InMemo DB");
        }
    }
}
Firstly, I am adding dependency to the lower level – the repository in this case. This is a simple interface which provides abstraction for fetching and adding data to the InMemory DB (an ArrayList :)).
Service handles the logic – the getById method takes care of the secure repository searching – prevents from trying to get object that doesn’t exist.
Repository
package com.rocketzki.domain;

import com.rocketzki.domain.model.Laptop;
import com.rocketzki.repository.InMemoRepository;
import org.springframework.stereotype.Component;

import java.util.ArrayList;
import java.util.List;

@Component
public class LaptopInMemoRepository implements InMemoRepository<Laptop> {

    private List<Laptop> laptops;

    LaptopInMemoRepository() {
        laptops = new ArrayList<>();
        laptops.add(new Laptop("MSI", "GE62", 4556.3, "AMD"));
        laptops.add(new Laptop("Lenovo", "G60", 3000.0, "Intel"));
    }

    public List<Laptop> getItems() {
        return laptops;
    }

    @Override
    public void addItem(Laptop item) {
        laptops.add(item);
    }
}
This is the “fake” database annotated with @Component so it will be detected by component scan and registered as a bean – it implements my InMemoRepository interface which provides method to communicate with the implemented repository:
package com.rocketzki.repository;

import java.util.List;

public interface InMemoRepository<T> {

    List<T> getItems();
    void addItem(T item);

}
The important part is the model, it has only the no args constructor, all args constructor, getter methos (we don’t need setters) and overriden toString() method to print object’s properties.
package com.rocketzki.domain.model;


public class Laptop {
    private String producer;
    private String model;
    private Double price;
    private String processorManufacturer;

    public Laptop() {

    }

    public Laptop(String producer, String model, Double price, String processorManufacturer) {
        this.model = model;
        this.producer = producer;
        this.price = price;
        this.processorManufacturer = processorManufacturer;
    }

    public String getModel() {
        return model;
    }

    public String getProducer() {
        return producer;
    }

    public Double getPrice() {
        return price;
    }

    public String getProcessorManufacturer() {
        return processorManufacturer;
    }

    @Override
    public String toString() {
        return "Laptop{" +
                "producer='" + producer + '\'' +
                ", model='" + model + '\'' +
                ", price=" + price +
                ", processorManufacturer='" + processorManufacturer + '\'' +
                '}';
    }
}
Most of those boiler plate methods can be easily generated by using InteliJ features. Just hit Alt+insert and generate them by yourself!
Last package contains ErrorController – it handles general error mapping and catches the only exception I am throwing consciously NoSuchElementException.
package com.rocketzki.error;

import org.springframework.web.bind.annotation.ExceptionHandler;
import org.springframework.web.bind.annotation.GetMapping;
import org.springframework.web.bind.annotation.RestControllerAdvice;

import java.util.Map;
import java.util.NoSuchElementException;

@RestControllerAdvice
public class ErrorController {

    @GetMapping("/error")
    public Map handleError() {
        return Map.of("error", "An error occurred.");
    }

    @ExceptionHandler(NoSuchElementException.class)
    public Map handleNoElementException(NoSuchElementException ex) {
        return Map.of("error", ex.toString());

    }
}
The first new thing here is the annotation: @RestControllerAdvice –
it’s a special controller that supports exception handling and model attributes globaly – to be used across all classes within the app. Here with “Rest” prefix it adds @ResponseBody – the return of the controller method is printed within the browser – JSON objects in your case.
As you can see I have used Map.of static factory method – it returns us immutable map of given parameters – this method is available since Java 9.
@ExceptionHandler(NoSuchElementException.class) – if the application throws the exception specified as a parameter of the annotation – it calls the annotated method. In this case it gives back the JSON with the stack trace.
@GetMapping(“/error”) – method annotated with “/error” route is called when server encounters any error that is not handled specifically (for instance by using ExceptionHandler). In this case I am printing a vague error message.
That’s it. It is that simple! The Spring framework let’s us implement apps quite quickly as you can see. Let’s run the app and see it in action.
In order to run it type gradle bootRun in the InteliJ terminal.
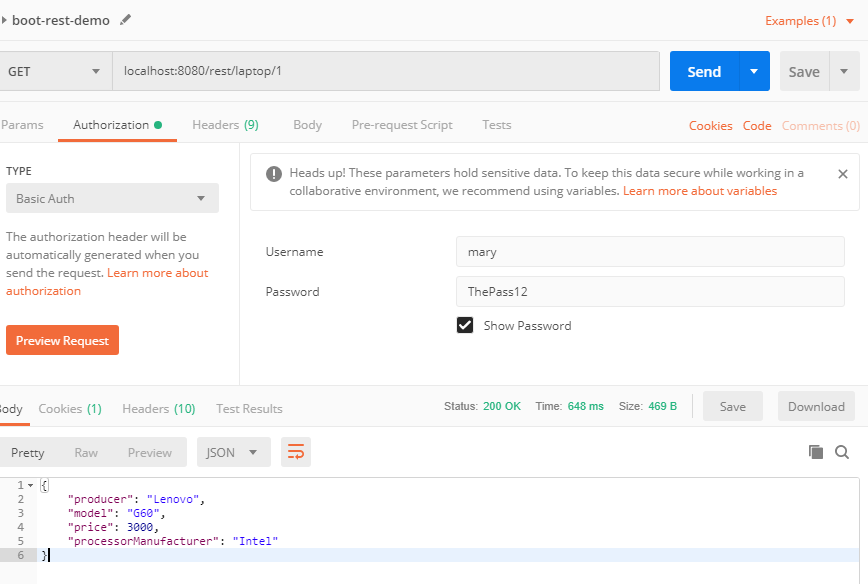
I am using Postman to test my REST api.
Correct GET request to /laptop/{id}
Correct POST request to /laptop/add

Incorrect GET request to /laptop/{id}

Incorrect GET request to /laptop/{id} – unauthorized – bad password

Check out some reference docs for more about Spring Security and Spring Boot
Here’s the link for full code repo
Should you have any questions don’t hesitate contacting me 🙂
[…] tool so you need to create a project first. You can read more about it in my other articles (Spring Boot, […]