
Hi coding enthusiasts! In this article I’m going to show you how to easily write Spring Boot application with authentication details stored within the database. I have chosen H2 db as it doesn’t require any installation. It’s embedded in our Spring application which makes it fast and really convinient for our demo. The database will be stored in memory which means it will live as long as the application is running. Each time we run the application it reinstantiates and starts from scratch.
In fact you can connect any db source you want. I have used H2 as it’s portable so it suits my purpose – to quickly write and run an app.
What do we need here?
Intelij Idea (you can go with Eclipse of course), jdk 11 , Gradle
Run InteliJ and create new Gradle project. Add the following dependencies to build.gradle file.
compile group: 'org.springframework.boot', name: 'spring-boot-starter-security', version: '2.1.5.RELEASE'
    compile group: 'org.springframework.boot', name: 'spring-boot-starter-web', version: '2.1.5.RELEASE'
    compile group: 'org.springframework.boot', name: 'spring-boot-starter-data-jpa', version: '2.1.5.RELEASE'
    compile group: 'com.h2database', name: 'h2', version: '1.4.199'
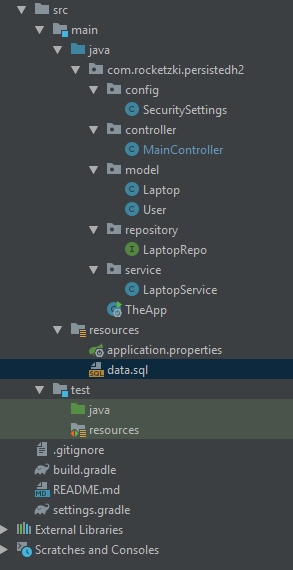
Refresh gradle project. My project tree looks like this:
First of all we need to add configuration files. First one is application.properties and second one data.sql which contains sql statements creating our in memory database.
application.properties
#Spring JPA configuration
spring.datasource.url=jdbc:h2:mem:demoh2db
spring.datasource.username=dbadm
spring.datasource.password=password
spring.jpa.database-platform=org.hibernate.dialect.H2Dialect
spring.datasource.driverClassName=org.h2.Driver

#SQL Queries for fetching users and laptop information stored in db
spring.queries.users-query=select username, password, enabled from users where username=?
spring.queries.roles-query=select username, role from roles where username=?

#H2 configuration
spring.h2.console.enabled=true
spring.h2.console.path=/h2
Here we set up the JPA attributes – the name of the db, user and password (which is also used to log in as admin to H2 console), drivers and dialect. Later we have queries for fetching data we need – user credentials and query for fetching our ‘business’ data (laptop information in this case). Then we configure H2 db – we enable access and set relative path to the console (eg. localhost:8080/h2).
data.sql
DROP TABLE IF EXISTS laptops;
CREATE TABLE laptops
(
    id                     INT AUTO_INCREMENT PRIMARY KEY,
    producer               VARCHAR(55) NOT NULL,
    model                  VARCHAR(55) NOT NULL,
    price                  DECIMAL(10) NOT NULL,
    processor_manufacturer VARCHAR(20) DEFAULT NULL
);

INSERT INTO laptops (producer, model, price, processor_manufacturer)
VALUES ('MSI', 'GE61', 2000, 'Intel'),
       ('Lenovo', 'G5', 1000, 'AMD'),
       ('Apple', 'MacBook Pro 13', 11000, 'Intel'),
       ('Toshiba', '400P', 6000, 'ARM');


DROP TABLE IF EXISTS users;
CREATE TABLE users
(
    id       INT AUTO_INCREMENT PRIMARY KEY,
    username VARCHAR(55)  NOT NULL,
    password VARCHAR(100) NOT NULL,
    enabled  BOOLEAN      NOT NULL
);

INSERT INTO users (username, password, enabled)
VALUES ('mary', '$2a$10$6n5MSOo87/wZ7tdXgi6tq.UUsQFMAu56DbpARHfnFtGMiHhjeDgFq', true),   -- password
       ('vinesh', '$2a$10$nT76r851fofA55wJO6QA1OJM7wZmnUVUfvv15FoRl1keZ77EkEYBO', true), -- pass
       ('thanos', '$2a$10$AW5G1nlMzXAXNsxXYDbdgO02vSRxgzcoGa54kImLH5c7KDV1XlaaO', true); -- pass2


DROP TABLE IF EXISTS roles;
CREATE TABLE roles
(
    id        INT AUTO_INCREMENT PRIMARY KEY,
    username  VARCHAR(55)  NOT NULL,
    role VARCHAR(55) NOT NULL
);
INSERT INTO roles(username, role)
VALUES ('mary', 'ADMIN'),
       ('vinesh', 'SUPERUSER'),
       ('thanos', 'USER');
The SQL code above is executed every time the application starts up. I’ve created a simple table structure. The application will be gathering credential info from users and roles tables and ‘business’ data from laptops table.
Now it’s time to create main class which sets up Spring Boot app.
TheApp.java
package com.rocketzki.persistedh2;

import org.springframework.boot.SpringApplication;
import org.springframework.boot.autoconfigure.SpringBootApplication;

@SpringBootApplication
public class TheApp {
    public static void main(String[] args) {
        SpringApplication.run(TheApp.class, args);
    }


}
We need to create configuration class also to determine which users can access which routes and tell Spring Security to use our H2 database as a credential source.
SecuritySettings.java
package com.rocketzki.persistedh2.config;

import org.springframework.beans.factory.annotation.Autowired;
import org.springframework.beans.factory.annotation.Value;
import org.springframework.context.annotation.Bean;
import org.springframework.context.annotation.Configuration;
import org.springframework.security.config.annotation.authentication.builders.AuthenticationManagerBuilder;
import org.springframework.security.config.annotation.web.builders.HttpSecurity;
import org.springframework.security.config.annotation.web.configuration.WebSecurityConfigurerAdapter;
import org.springframework.security.crypto.bcrypt.BCryptPasswordEncoder;
import org.springframework.security.crypto.password.PasswordEncoder;

import javax.sql.DataSource;

@Configuration
public class SecuritySettings extends WebSecurityConfigurerAdapter {

    private DataSource dataSource;

    @Value("${spring.queries.users-query}")
    private String usersQuery;

    @Value("${spring.queries.roles-query}")
    private String authQuery;

    @Autowired
    public SecuritySettings(DataSource ds) {
        this.dataSource = ds;
    }

    @Override
    protected void configure(AuthenticationManagerBuilder auth)
            throws Exception {
        auth.
                jdbcAuthentication()
                .usersByUsernameQuery(usersQuery)
                .authoritiesByUsernameQuery(authQuery)
                .dataSource(dataSource)
                .passwordEncoder(passEncrypt());
    }


    @Override
    protected void configure(HttpSecurity httpSecurity) throws Exception {
        httpSecurity
                .formLogin()
                .and()
                .csrf().disable()
                .authorizeRequests()
                .antMatchers("/").authenticated()
                .antMatchers("/laptops").hasAnyAuthority("SUPERUSER", "ADMIN")
                .antMatchers("/h2/**").hasAuthority("ADMIN")
                .and()
                .headers().frameOptions().disable()
                .and()
                .logout();
    }

    @Bean
    public PasswordEncoder passEncrypt() {
        return new BCryptPasswordEncoder();
    }
}
The class needs to be annotated with @Configuration so it’s registered as a bean during component scan. We need also add dependency to DataSource – I have user autowiring on a method level. The DataSource interface is designed to hold information about data source configured in the Spring Boot application. Once the application is instantiated, Spring injects the dependency to our configuration class so we can access it via DataSource interface.
Let’s discuss the configuration methods. First one builds Authentication Manager object. We need to provide: queries for fetching user credentials and roles, the beforementioned data source and password encryptor. Bean for password encryption has also been registered within the configuration class. Notice that I have used @Value annotations over two String fields. Spring automatically injects values from application.properties file
Second configuraton method sets up our Spring Security features. It enabled login form, prevents from CSRF attacks, enabled logout (user needs to go to /logout to log off the app) and adds custom rules for URLs in our app.
The rest of the application is quite simple. There’s a controller which communicates with the user, the service which is the layer between controller and repository (which connects to the database using Spring JPA). Model describes the data structure to hold information – in this case describes the real object which is a laptop or a user.
MainController.java
package com.rocketzki.persistedh2.controller;

//imports ...

@Controller
public class MainController {

    private LaptopService laptopService;

    @Autowired
    public MainController(LaptopService laptopService) {
        this.laptopService = laptopService;
    }

    @GetMapping("/")
    @ResponseBody
    public String getHomePage() {
        return "Welcome Dear " + SecurityContextHolder.getContext().getAuthentication().getName();
    }

    @GetMapping("/laptops")
    @ResponseBody
    public String getLaptops() {
        return laptopService.getAllLaptops().toString();
    }
}
Notice the static method I applied here SecurityContextHolder gives us access to the current security context and get user data for example.
Model simple java POJO
Laptop.java
package com.rocketzki.persistedh2.model;

import javax.persistence.Entity;
import javax.persistence.Id;

@Entity
public class Laptop {
    @Id
    private int id;
    private String producer;
    private String model;
    private Double price;
    private String processorManufacturer;

    public Laptop() {

    }

    public Laptop(String producer, String model, Double price, String processorManufacturer) {
        this.model = model;
        this.producer = producer;
        this.price = price;
        this.processorManufacturer = processorManufacturer;
    }

    public String getModel() {
        return model;
    }

    public String getProducer() {
        return producer;
    }

    public Double getPrice() {
        return price;
    }

    public String getProcessorManufacturer() {
        return processorManufacturer;
    }

    @Override
    public String toString() {
        return "Laptop{" +
                "producer='" + producer + '\'' +
                ", model='" + model + '\'' +
                ", price=" + price +
                ", processorManufacturer='" + processorManufacturer + '\'' +
                '}';
    }
}
Laptop POJO class is annotated with @Entity so that Spring JPA knows that the class maps to the entity object in a database.
LaptopService.java
package com.rocketzki.persistedh2.service;

import com.rocketzki.persistedh2.model.Laptop;
import com.rocketzki.persistedh2.repository.LaptopRepo;
import org.springframework.beans.factory.annotation.Autowired;
import org.springframework.stereotype.Service;

import java.util.List;

@Service
public class LaptopService {

    private LaptopRepo repo;

    @Autowired
    public LaptopService(LaptopRepo repo) {
        this.repo = repo;
    }


    public List<Laptop> getAllLaptops() {
        return repo.getAllLaptops();
    }


}
LaptopRepo.java
package com.rocketzki.persistedh2.repository;

import com.rocketzki.persistedh2.model.Laptop;
import org.springframework.data.jpa.repository.JpaRepository;
import org.springframework.data.jpa.repository.Query;
import org.springframework.stereotype.Repository;

import java.util.List;

@Repository
public interface LaptopRepo extends JpaRepository<Laptop, Integer> {

    @Query(value = "select * from laptops", nativeQuery = true)
    List<Laptop> getAllLaptops();


}
LaptopRepo interface extends Spring JPAs built-in interface JpaRepository<T, ID> which enables automatic database access object generation. We just need to provide entity and id types (Laptop and Integer in this case), and DAOs are created for us. Using @Query annotation we are allowed to input any type of sql query we want but we need to keep in mind that the result from db must match method return type. In this case it can be zero or more Laptop objects. More on Spring JPA and @Query annotation.
Time to run the application!
Type gradle bootRun in the terminal and hit enter to run the application. Go to localhost:8080/h2 and login using u: mary, pass: password
You will be shown H2 console login. Put login from application.properties file to enter the console.
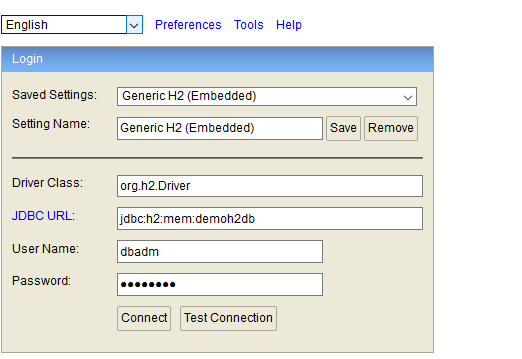

You can change options and look around the console.
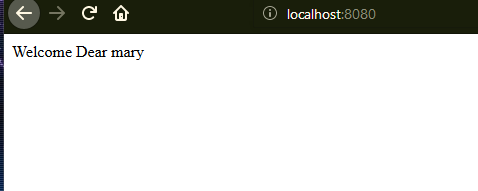
Now let’s check the other URLs. http://localhost:8080/ takes us to the main page:
And localhost:8080/laptops shows us the laptop list:

It’s unformatted and pure result of the toString() method called on the laptop list. I encourage you to play with the code and try to beautify it and change a bit. Adding possiblity to add laptops for instance.
I hoped that article shed some light on the topic. Here are some references to dig deeper into those subjects.
Here’s the link for full code repo
Should you have any questions don’t hesitate contacting me 🙂