
Hi coding enthusiasts! Web development is a huge part of the market and Spring Boot is the Java world answer to its needs. We can quickly code reliable web applications using our favorite language – Java of course.
What is Thymeleaf? It is a template engine enabling developers to create elegant and reusable website modules and entire websites. Its principle is similar to JSP or PHP – the html code is generated on server side and sent to the client.
I have prepared a piece of code for you. This is pretty simple Snake game with user registration and score board (Hall of Fame) – well known from our NOKIA 3310 phones with a little bit of graphical enhancement. The javascript source code and resources have been downloaded from here, video to the js tutorial is here. I’ve done some changes to the code so it’s compliant with my creative idea 🙂
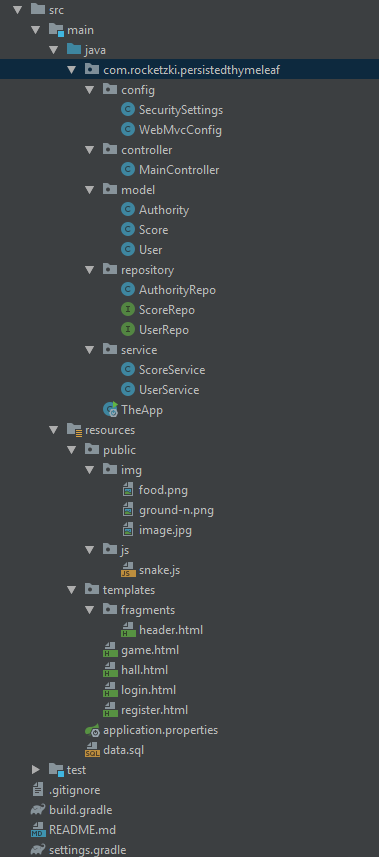
That’s how the project structure looks like:
We need to start off with adding some Gradle dependencies (build.gradle file):
plugins {
    id 'java'
}

group 'how-tos'
version '1.0-SNAPSHOT'

sourceCompatibility = 1.8

repositories {
    mavenCentral()
}

dependencies {
    testCompile group: 'junit', name: 'junit', version: '4.12'
    compile group: 'org.springframework.boot', name: 'spring-boot-starter-security', version: '2.1.5.RELEASE'
    compile group: 'org.springframework.boot', name: 'spring-boot-starter-web', version: '2.1.5.RELEASE'
    compile group: 'org.springframework.boot', name: 'spring-boot-starter-data-jpa', version: '2.1.5.RELEASE'
    compile group: 'com.h2database', name: 'h2', version: '1.4.199'
    compile group: 'org.springframework.boot', name: 'spring-boot-starter-thymeleaf', version: '2.1.6.RELEASE'
    compile group: 'org.thymeleaf.extras', name: 'thymeleaf-extras-springsecurity5', version: '3.0.4.RELEASE'
}
The application needs to be conifgured properly. First class to show is the spring security and mvc configuration class.
SecuritySettings.java
package com.rocketzki.persistedthymeleaf.config;

import org.springframework.beans.factory.annotation.Autowired;
import org.springframework.beans.factory.annotation.Value;
import org.springframework.context.annotation.Bean;
import org.springframework.context.annotation.Configuration;
import org.springframework.security.config.annotation.authentication.builders.AuthenticationManagerBuilder;
import org.springframework.security.config.annotation.web.builders.HttpSecurity;
import org.springframework.security.config.annotation.web.builders.WebSecurity;
import org.springframework.security.config.annotation.web.configuration.WebSecurityConfigurerAdapter;
import org.springframework.security.crypto.bcrypt.BCryptPasswordEncoder;
import org.springframework.security.crypto.password.PasswordEncoder;

import javax.sql.DataSource;

@Configuration
public class SecuritySettings extends WebSecurityConfigurerAdapter {

    private DataSource dataSource;

    @Value("${spring.queries.users-query}")
    private String usersQuery;

    @Value("${spring.queries.authorities-query}")
    private String authQuery;

    @Autowired
    public SecuritySettings(DataSource ds) {
        this.dataSource = ds;
    }

    @Override
    protected void configure(AuthenticationManagerBuilder auth)
            throws Exception {
        auth.
                jdbcAuthentication()
                .usersByUsernameQuery(usersQuery)
                .authoritiesByUsernameQuery(authQuery)
                .dataSource(dataSource)
                .passwordEncoder(passEncrypt());
    }


    @Override
    protected void configure(HttpSecurity httpSecurity) throws Exception {
        httpSecurity
                .authorizeRequests()
                .antMatchers("/hall", "/game","/js/**","/").authenticated()
                .antMatchers("/register", "/h2/**").hasAnyAuthority("ADMIN")
                .and()
                .csrf().disable()
                .formLogin()
                .loginPage("/login").failureUrl("/login?error=true")
                .defaultSuccessUrl("/game", true)
                .usernameParameter("username")
                .passwordParameter("password")
                .and()
                .headers().frameOptions().sameOrigin()
                .and()
                .logout();
    }


    @Override
    public void configure(WebSecurity web) {
        web
                .ignoring()
                .antMatchers("/resources/**", "/static/**", "/css/**", "/js/**",
                        "/images/**", "resources/uploads/**", "/uploads/**", "/resources/static/img/**");
    }


    @Bean
    public PasswordEncoder passEncrypt() {
        return new BCryptPasswordEncoder();
    }
}
The class extends WebSecurityConfigurerAdapter and is annotated as @Configuration which makes it searchable by the Spring framework. Alle the overriden methods are responsible for spring security configuration. I add the DataSource dependencies so Spring knows where to take user credentials information from. Later I set up spring security details – paths and roles responsible for access to specific routes and other spring security specific options. Take a notice at .usernameParameter(“username”) and .passwordParameter(“password”) parameters – they need to be the same as HTML object’s id. So the input field in which user puts his/her password has has to have id of “username” (<input id=”username”…).
The other method allows users to access static resources and the last one registers password encryption bean.
This class is pretty similiar to the one I have described in my previous article – you can find a thorough explanation of each line of Security configuration code there.
Let’s talk about the controllers. Controllers doethe view <-> service communication – it listens to the requests from the browser and acts upon them accordingly.
package com.rocketzki.persistedthymeleaf.controller;

import com.rocketzki.persistedthymeleaf.model.User;
import com.rocketzki.persistedthymeleaf.service.UserService;
import org.springframework.beans.factory.annotation.Autowired;
import org.springframework.stereotype.Controller;
import org.springframework.validation.BindingResult;
import org.springframework.web.bind.annotation.GetMapping;
import org.springframework.web.bind.annotation.PostMapping;
import org.springframework.web.bind.annotation.RequestMapping;
import org.springframework.web.bind.annotation.RequestParam;
import org.springframework.web.servlet.ModelAndView;

import javax.validation.Valid;
import java.util.Optional;

@Controller
@RequestMapping("/")
public class MainController {

    private UserService userService;

    @Autowired
    public MainController(UserService userService) {
        this.userService = userService;
    }

    @GetMapping({"/", "/game"})
    public ModelAndView getHomePage() {
        return new ModelAndView("game");
    }

    @GetMapping("/login")
    public ModelAndView showLoginPage(@RequestParam(required = false) String error,
                                      ModelAndView mav,
                                      BindingResult bindingResult) {
        mav.setViewName("login");
        if ("true".equals(error)) {
            mav.addObject("error", "Login error - bad username or password.");
        }
        return mav;
    }


    @GetMapping("/register")
    public ModelAndView showRegistration() {
        return new ModelAndView("register");
    }


    @PostMapping(value = "/register")
    public ModelAndView registerUser(ModelAndView modelAndView,
                                     @Valid User user,
                                     BindingResult bindingResult) {
        Optional.ofNullable(userService.findByUsername(user.getUsername())).ifPresent(
                u -> bindingResult.rejectValue("username", "error.user", "The username is in use!"));

        if (bindingResult.hasErrors()) {
            modelAndView.addObject("error", "Fill in all fields!");
            modelAndView.setViewName("register");
        } else {
            userService.saveUser(user);
            modelAndView.addObject("success", "User has been registered!");
        }
        return modelAndView;
    }


}
The MainController class has been annotated with @Controller and
@RequestMapping(“/”) which makes Spring treat it as a controller and sets up a path “/” for each request sent to the application. For instance, if I call address of “localhost:8080/” it will first of all look for any method that matches route “/” within MainController instance.
Then I set the necessary dependency – UserService injected via constructor which is the recommended way of using dependency injection in such cases.
Take a look at the annotations @GetMapping and @PostMapping. They mark those methods to be called whenever a request to a certain route reaches the application. For instance, when I go to localhost:8080/login in my webbrowser, application searches for the method mapped to this route, it’s showLoginPage in this case. When I go to a website using a browser it uses http GET method – that’s why I annotate my methods with @GetMapping. If I want my method to handle POST requests I need to mark them with @PostMapping. Those annotations are called composed annotations. They consist of other annotations. It can be used instead of the older one, eg. @RequestMapping(method = RequestMethod.GET) for our convinience.
In beforementioned method showLoginPage I have used some additional paramateres. First one @RequestParam(required = false) String error is the parameter that stores the paramater passed by the browser in an address bar. @RequestParam annotation marks it as an address bar parameter. It’s there for error handling but params can be used for many other applications as well (sending form data, filtering and so on).
The other one is really important and I use it widely within my app. ModelAndView mav is the object that is passed to the view compotent of Spring Boot app and stores all objects that are passed to the current view (generated html code). In this method I set the view name to “login” – Spring Boot searches for login.html file in the templates directory and generates view using this template. Then it checks whether or not the error variable holds “true” value which means that an error occured during signing up process. If so, it adds an object called “error” with text “Login error – bad username or password.” which is then handled by Thymeleaf and showed to the client.
Now let’s talk about the registration method that handles POST requests the registerUser method. It is called when user hits Register button during registration process. The view component applies the form and send POST request to the controller. Then the method registerUser method is called. This method checks whether the user exist and passes the error message to the view. If there’s no error, the controller invokes UserService which saves newly created user and passes success message to the view.
ScoreController.java
package com.rocketzki.persistedthymeleaf.controller;

import com.rocketzki.persistedthymeleaf.model.Score;
import com.rocketzki.persistedthymeleaf.service.ScoreService;
import org.springframework.beans.factory.annotation.Autowired;
import org.springframework.stereotype.Controller;
import org.springframework.web.bind.annotation.GetMapping;
import org.springframework.web.bind.annotation.RequestParam;
import org.springframework.web.bind.annotation.ResponseBody;
import org.springframework.web.servlet.ModelAndView;

@Controller
public class ScoreController {

    private ScoreService scoreService;

    @Autowired
    public ScoreController(ScoreService scoreService) {
        this.scoreService = scoreService;

    }

    @GetMapping("/hall")
    public ModelAndView showHallOfFame(ModelAndView mav) {
        mav.addObject("scores", scoreService.getAllScores());
        mav.setViewName("hall");
        return mav;
    }

    @GetMapping("/sendScore")
    @ResponseBody
    public Score sendScore(@RequestParam Integer score) {
        return scoreService.saveScore(score);
    }

}
That piece of code, as its name says, is responsible for handling user’s score. The showHallOfFame method is quite straightforward – it adds the list of Score objects supplied by the ScoreService to the view, sets the view name and returns it to the view handler.
The other one handles sending score to the database. Once the game is over, the frontend calls /sendScore method passing the score using the “score” parameter, eg. “localhost:8080/sendScore?score=23”.
So that was the controllers part. Now let’s move on to services. Serivce classes do the whole application logic – it’s not too complicated in this one though – and communicates controllers with the repository – the database interface.
UserService.java
package com.rocketzki.persistedthymeleaf.service;

import com.rocketzki.persistedthymeleaf.model.User;
import com.rocketzki.persistedthymeleaf.repository.AuthorityRepo;
import com.rocketzki.persistedthymeleaf.repository.UserRepo;
import org.springframework.beans.factory.annotation.Autowired;
import org.springframework.security.crypto.password.PasswordEncoder;
import org.springframework.stereotype.Service;

@Service
public class UserService {

    private UserRepo userRepo;
    private AuthorityRepo authorityRepo;
    private PasswordEncoder passEncoder;


    @Autowired
    public UserService(AuthorityRepo authorityRepo, UserRepo userRepo, PasswordEncoder passEncoder) {
        this.userRepo = userRepo;
        this.authorityRepo = authorityRepo;
        this.passEncoder = passEncoder;
    }

    public User findByUsername(String username) {
        return userRepo.findByUsername(username);
    }

    public User saveUser(User user) {
        user.setEnabled(true);
        user.setPassword(passEncoder.encode(user.getPassword()));
        setUserAuthority(user, "ADMIN");
        return userRepo.save(user);
    }

    private void setUserAuthority(User user, String authority){
        authorityRepo.setUserAuthority(user.getUsername(), authority);
    }


}
The class is annotated with @Service to be registered as a service bean durign component scan. Then the required dependencies are added and injected via constructor. Those methods are invoking repository objects which returns data we want and perform save operations.
ScoreService.java
package com.rocketzki.persistedthymeleaf.service;

import com.rocketzki.persistedthymeleaf.model.Score;
import com.rocketzki.persistedthymeleaf.repository.ScoreRepo;
import org.springframework.beans.factory.annotation.Autowired;
import org.springframework.security.core.context.SecurityContextHolder;
import org.springframework.stereotype.Service;

import java.time.LocalDateTime;
import java.util.List;

@Service
public class ScoreService {

    private ScoreRepo repo;

    @Autowired
    public ScoreService(ScoreRepo repo) {
        this.repo = repo;
    }

    public List<Score> getAllScores() {
        return repo.getAllScores();
    }

    public Score saveScore(Integer score) {
        String loggedInUser = SecurityContextHolder.getContext().getAuthentication().getName();
        return repo.save(new Score(loggedInUser, score, LocalDateTime.now()));
    }


}
ScoreService class does the same thing when it comes to the score handling. It’s an intermediary layer between controller and repository (db interface).
Let’s get to another module- the models. Models that I am using in my app are java classes that maps the entities in the database. Spring JPA framework gives us interface to do that painlessly and quickly.
Let’s have a look at User class.
User.java
package com.rocketzki.persistedthymeleaf.model;

import javax.persistence.Entity;
import javax.persistence.GeneratedValue;
import javax.persistence.GenerationType;
import javax.persistence.Id;

@Entity
public class User {
    @Id
    @GeneratedValue(strategy = GenerationType.IDENTITY)
    private int id;
    private String username;
    private String password;
    private Boolean enabled;


    public User() {

    }

    public User(String username, String password, Boolean enabled) {
        this.password = username;
        this.username = password;
        this.enabled = enabled;

    }
    public int getId() {
        return id;
    }

    public String getPassword() {
        return password;
    }

    public String getUsername() {
        return username;
    }


    public void setUsername(String username) {
        this.username = username;
    }

    public void setPassword(String password) {
        this.password = password;
    }

    public Boolean getEnabled() {
        return enabled;
    }

    public void setEnabled(Boolean enabled) {
        this.enabled = enabled;
    }
}
It’s just simple POJO with additional annotations. @Entity says that this class maps to the db entity, @Id, @GeneratedValue(strategy = GenerationType.IDENTITY) on field level marks “id” field as an Id column in the database table and ensures automatic incremental id generation.
Repositories are kind of objects that connect the application with the database. They provide communication between services and the db. Let’s have a look at my repository classes.
UserRepo.java
package com.rocketzki.persistedthymeleaf.repository;

import com.rocketzki.persistedthymeleaf.model.User;
import org.springframework.data.jpa.repository.JpaRepository;
import org.springframework.stereotype.Repository;

@Repository
public interface UserRepo extends JpaRepository<User, Integer> {

    User findByUsername(String username);
}
As you can see it’s an interface. Spring JPA made it really simple and easy to use. All the information required to establish connection with the database are provided in the application.properties file. The rest is done by the amazing Spring framework.
My interface has to extend the JpaRepository<T, ID> giving the type of the object retrieved from the the db (T) and the type of id (ID). The class provided as T must be marked as @Entity.
The only method in this interface is automatically generated by the Spring JPA. I just need to provide the return type of the method (it has to match the one provided in class signature) and the paramatere by which I perform the search. The framework generates the query and the rest of the code for me. More on this extensive topic can be found here. Ok It’s all good but what if I want to execute some custom query? I can do it by using @Query interface. Take a look at ScoreRepo.
ScoreRepo.java
package com.rocketzki.persistedthymeleaf.repository;

import com.rocketzki.persistedthymeleaf.model.Score;
import org.springframework.data.jpa.repository.JpaRepository;
import org.springframework.data.jpa.repository.Query;
import org.springframework.stereotype.Repository;

import java.util.List;

@Repository
public interface ScoreRepo extends JpaRepository<Score, Integer> {

    @Query(value = "select * from score", nativeQuery = true)
    List<Score> getAllScores();


}
By setting nativeQuery I can write queries in the language of my database.
The other repo I am using is a custom one. It creates sql statement by itself and executes it using the EntityManager. Let’s have a look:
package com.rocketzki.persistedthymeleaf.repository;

import org.springframework.stereotype.Repository;
import org.springframework.transaction.annotation.Transactional;

import javax.persistence.EntityManager;
import javax.persistence.PersistenceContext;

@Repository
public class AuthorityRepo {

    private static final String INSERT_SCORE_STATEMENT = "insert into authority (username, type) values (?,?)";

    @PersistenceContext
    private EntityManager entityManager;

    @Transactional
    public void setUserAuthority(String username, String type) {
        entityManager.createNativeQuery(INSERT_SCORE_STATEMENT)
                .setParameter(1, username)
                .setParameter(2, type)
                .executeUpdate();
    }

}
The class is annotated with @Repository which marks it as a component during the component scan. I have added a dependency to the EntityManager and annotated it with @PersistenceContext.
A little bit about the EntityManager and the PersistenceContext. The EntityManager is always associated with a persistence context. The lifecycle and instances of entities are managed within the persistence context. A persistence context behaves just like a cache containing set of persistent entities. Once the transacton is finished all the persistent objects are set to the detached state and are no longer managed by the context.
The setUserAuthority method sets up an authority parameter for newly created user (USER, ADMIN etc. but with this application the default value is set to “ADMIN”). The method is annotated with @Transactional which means that Spring framweork does the transaction management like beginning, closinsg and error handling for us. Without the @Transactional annotation and Spring framwework assstance we’d have to code it like this:
UserTransaction transaction = entityManager.getTransaction();

try {
    transaction.begin();

//   code.....

    transaction.commit();
} catch(Exception ex) {
    transaction.rollback();
    throw ex;
}
So the method performs the database transaction by using the EntityManager instance which executes the SQL statement with parameters I’ve built. Such a method can is invoked by the ScoreService.
That’s it when it comes to the backend. Now let’s talk about the frontend part – the Thymeleaf template engine and its configuration.
Templates are just html files with special tags which dynamically build the website content. I will show you how it works on an example. Let’s have a look at the login page of the application.
login.html
<html lang="en" xmlns="http://www.w3.org/1999/xhtml" xmlns:th="http://www.thymeleaf.org">
<head>
    <title>Rocketzki's Snake!</title>
    <meta charset="utf-8">
    <meta content="width=device-width, initial-scale=1, shrink-to-fit=no" name="viewport">
    <!-- Bootstrap CSS -->
    <link crossorigin="anonymous" href="https://maxcdn.bootstrapcdn.com/bootstrap/4.0.0/css/bootstrap.min.css"
          integrity="sha384-Gn5384xqQ1aoWXA+058RXPxPg6fy4IWvTNh0E263XmFcJlSAwiGgFAW/dAiS6JXm" rel="stylesheet">

</head>
<body style="background-color: #e0ccff">
<div class="container" th:replace="fragments/header :: header"></div>

<div class="container">
    <div class="row"><br></div>
    <div class="row" style="vertical-align:middle; padding:300px;">
        <div class="col"></div>
        <div class="col-sm-10">
            <div class="shadow p-3 mb-5 rounded" style="background-color: #eadfff">
                <h3 class="text-center">Enter your credentials:<br><br></h3>
                <form action="/login" method="post">
                    Username:<br>
                    <input class="form-control" name="username" required type="text"><br>
                    Password:<br>
                    <input class="form-control" name="password" required type="password"><br>
                    <input class="btn btn-success" style="horiz-align: center; vertical-align: center" type="submit"
                           value="Enter the game">
                    <h2><span class="text-danger" th:utext="${error}"></span></h2>


                </form>
            </div>
        </div>
        <div class="col"></div>
    </div>
</div>

</body>
</html>
First of all we need to point the html page to the Thymyleaf namespace by adding an attribute: <html lang=”en” xmlns=”http://www.w3.org/1999/xhtml” xmlns:th=”http://www.thymeleaf.org”>
With that we can use all avaiable Thymeleaf tags using th: prefix. Let’s discuss Thymeleaf elements used in this document.
The “div” tag at the top of the file has been enriched with th:replace attribute. It replaces the area of the “div” tag with the content of the file pointed by the value of th:replace=”fragments/header :: header” – this feature is called fragments. We can dynamically replace areas of our website making our templates reusable. In my example I replace header as a fragment so that I avoid code repetition and make it more concise. The fragments/header is the path to the header.html file and :: header points to the sepcific tag within the header.html file which looks like this:
<html lang="en" xmlns="http://www.w3.org/1999/xhtml" xmlns:sec="http://www.thymeleaf.org/extras/spring-security"
      xmlns:th="http://www.thymeleaf.org">
<head>
    <title>Rocketzki's Persisted Thymeleaf Demo</title>
    <meta charset="utf-8">
    <meta content="width=device-width, initial-scale=1, shrink-to-fit=no" name="viewport">
    <!-- Bootstrap CSS -->
    <link crossorigin="anonymous" href="https://maxcdn.bootstrapcdn.com/bootstrap/4.0.0/css/bootstrap.min.css"
          integrity="sha384-Gn5384xqQ1aoWXA+058RXPxPg6fy4IWvTNh0E263XmFcJlSAwiGgFAW/dAiS6JXm" rel="stylesheet">

</head>
<body style="background-color: #e0ccff">
<nav class="navbar navbar-expand-lg navbar-light" style="background-color: #563d7c" th:fragment="header">
    <ul class="navbar-nav">
        <li class="nav-item">
            <h3><a href="/game" style="color: aliceblue">The Snake!</a></h3></li>
        <li class="nav-item" sec:authorize="isAuthenticated()">
            <a class="nav-link navbar-brand font-light" style="color: aliceblue" th:href="@{/hall}">Hall of Fame!</a>
        </li>

        <li class="nav-item" sec:authorize="hasAuthority('ADMIN')">
            <a class="nav-link navbar-brand font-light" style="color: aliceblue" th:href="@{/register}">Register new
                user</a>
        </li>
    </ul>


    <ul class="navbar-nav flex-row ml-md-auto d-none d-md-flex">
        <li class="nav-item" sec:authorize="isAuthenticated()">
            <a class="nav-link navbar-brand font-light" href="/logout" style="color: aliceblue">Logout</a>
        </li>
    </ul>
</nav>
</body>
</html>
Take a notice at the tag: <nav class=”navbar navbar-expand-lg navbar-light” style=”background-color: #563d7c” th:fragment=”header”> – it’s labeled as “header” using th:fragment attribute. This part (whole <nav> tag) of the html file will be replaced in the login.html document.
Let’s go back to the login.html file for a moment and take a look at the <h2><span class=”text-danger” th:utext=”${error}”></span></h2> tag. The th:utext attribute is binded to the error object. It means that once the page is rendered, the Thymeleaf engine will replace the <span> tag with the content of the error object provided by the controller that points to login.html file. If the object is empty (when there’s no error) the tag will be empty and no text will appear. The $ sign is a part of a standard expression syntax which is a part of the Standard Dialect. It’s really cool and I recommend reading docs.
${...}: Variable expressions.*{...}: Selection expressions.#{...}: Message (i18n) expressions.@{...}: Link (URL) expressions.~{...}: Fragment expressions.
Let’s talk about header as it contains something more that just Thymeleaf. I have added Spring Security expressions which decide whether or not show parts of a webpage to the currently signed in user. Additional namespace had to be added so Thymeleaf can support Spring sec attributes: <html lang=”en” xmlns:sec=”http://www.thymeleaf.org/extras/spring-security”
xmlns:th=”http://www.thymeleaf.org”> – it means that all security attributes will be marked with sec: prefix. Have a look at this piece of header.html code:
<li class="nav-item" sec:authorize="isAuthenticated()">
            <a class="nav-link navbar-brand font-light" style="color: aliceblue" th:href="@{/hall}">Hall of Fame!</a>
        </li>

        <li class="nav-item" sec:authorize="hasAuthority('ADMIN')">
            <a class="nav-link navbar-brand font-light" style="color: aliceblue" th:href="@{/register}">Register new
                user</a>
        </li>
The first <li> element has sec:authorize attribute which takes a boolean value. This value is returned by isAuthenticated() method provided by Spring Security plugin. So basically if it returns true and user is authenticated the tag will be rendered and visible for the currently logged in user. Otherwise it will not appear at all. That’s how we can manipulate the content of our website and show it to the users who have the right permissions. The other <li> tag uses another method: hasAuthority(‘ADMIN’) which checks if user has authority of ADMIN – and render the element of not depending of the returned value. Expression used within sec:authorize attribue are called Spring Expression Language (SpEL). It’s pretty neat and I believe you’d really like reading about it. Link to the docs.
The last file I’m gonna discuss is the score board view.
hall.html
<html lang="en" xmlns="http://www.w3.org/1999/xhtml" xmlns:th="http://www.thymeleaf.org">
<head>
    <title>Rocketzki's Snake!</title>
    <meta charset="utf-8">
    <meta content="width=device-width, initial-scale=1, shrink-to-fit=no" name="viewport">

    <!-- Bootstrap CSS -->
    <link crossorigin="anonymous" href="https://maxcdn.bootstrapcdn.com/bootstrap/4.0.0/css/bootstrap.min.css"
          integrity="sha384-Gn5384xqQ1aoWXA+058RXPxPg6fy4IWvTNh0E263XmFcJlSAwiGgFAW/dAiS6JXm" rel="stylesheet">

</head>
<body style="background-color: #e0ccff">
<div class="container" th:replace="fragments/header :: header"></div>
<br><br>

<table class="table">
    <thead class="thead-dark">
    <tr>
        <th scope="col">#</th>
        <th scope="col">Name</th>
        <th scope="col">Score</th>
        <th scope="col">Timestamp</th>
    </tr>
    </thead>
    <tbody>


    <tr th:each="score : ${scores}">
        <td th:text="${score.id != null}? ${score.id} : 'None'"></td>
        <td th:text="${score.username != null}? ${score.username} : 'None'"></td>
        <td th:text="${score.points != null}? ${score.points} : 'None'"></td>
        <td th:text="${score.date != null}?
                        ${#temporals.format(score.date, 'dd-MM-yyyy HH:mm')}: 'None'"></td>
    </tr>


    </tbody>
</table>
</body>
</html>
Apart from using fragment feature to render header, I have used a foreach loop to generate a list of scores fetched from the database. The th:each attribute iterates through a given list (scores object provided by controller is a list) and acts like a regular foreach loop in java. Notice that I can refer to the object fields using dots (eg. score.username) and build custom expression using SpEL. #temporals – gives me access to built-in convenience methods handling time display etc. Thymeleaf has many different exprssions available. You can check them out here at Baeldung’s blog.
Last things I’d like to mention is the application.properties file and sql script. The first one stores configuration for our Spring Boot app and sets up parameters for app modules like data source, thymeleaf templates path or custom ones like sql queries. They can be accessed (for instance) via @Value annotation like I’ve done it in SecuritySettings class.
application.properties
#Spring JPA configuration
spring.datasource.url=jdbc:h2:mem:demoh2db
spring.datasource.username=dbadm
spring.datasource.password=password
spring.jpa.database-platform=org.hibernate.dialect.H2Dialect
spring.datasource.driverClassName=org.h2.Driver
spring.jpa.open-in-view=false

#SQL Queries for fetching users and laptop information stored in db
spring.queries.users-query=select username, password, enabled from user where username=?
spring.queries.authorities-query=select username, type from authority where username=?

#H2 configuration
spring.h2.console.enabled=true
spring.h2.console.path=/h2

#Thymeleaf config
spring.thymeleaf.enabled=true
spring.thymeleaf.prefix=classpath:/templates/
spring.thymeleaf.suffix=.html
The data.sql file is executed against the data source specified in the application.properties file by default (it’s a standard setting for Spring JPA). It creates tables and inserts initial data to our H2 database.
data.sql
DROP TABLE IF EXISTS score;
CREATE TABLE score
(
    id                     INT AUTO_INCREMENT PRIMARY KEY,
    username               VARCHAR(55) NOT NULL,
    points                  DECIMAL (55) NOT NULL,
    date                  TIMESTAMP NOT NULL
);


DROP TABLE IF EXISTS user;
CREATE TABLE user
(
    id       INT AUTO_INCREMENT PRIMARY KEY,
    username VARCHAR(55)  NOT NULL,
    password VARCHAR(100) NOT NULL,
    enabled  BOOLEAN      NOT NULL
);

INSERT INTO user (username, password, enabled)
VALUES ('mary', '$2a$10$6n5MSOo87/wZ7tdXgi6tq.UUsQFMAu56DbpARHfnFtGMiHhjeDgFq', true),   -- password
       ('vinesh', '$2a$10$nT76r851fofA55wJO6QA1OJM7wZmnUVUfvv15FoRl1keZ77EkEYBO', true), -- pass
       ('thanos', '$2a$10$AW5G1nlMzXAXNsxXYDbdgO02vSRxgzcoGa54kImLH5c7KDV1XlaaO', true); -- pass2


DROP TABLE IF EXISTS authority;
CREATE TABLE authority
(
    id        INT AUTO_INCREMENT PRIMARY KEY,
    username  VARCHAR(55)  NOT NULL,
    type VARCHAR(55) NOT NULL
);
INSERT INTO authority (username, type)
VALUES ('mary', 'ADMIN'),
       ('vinesh', 'SUPERUSER'),
       ('thanos', 'USER');
That’s it when it comes to building the Snake game using thymeleaf and Spring framework. You can do anything you want with this code, I encourage you to do so as it’s the best way to learn new skills.
Here’s the link for full code repo
Should you have any questions don’t hesitate contacting me 🙂 code your best.